Free VERI*FACTU application from the AEAT
Skip information indexApplication management tools
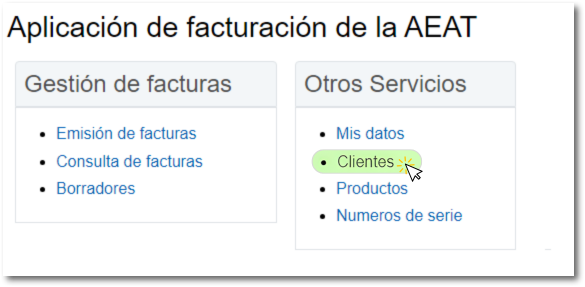
From the main menu of the billing application of the AEAT You can manage your clients in the "Other Services" section, "Clients".
You can register new clients, retrieve clients from your existing client portfolio, export the complete client list to make a copy and later restore it, import a file that fits the required structure, and delete one or more clients from the list.
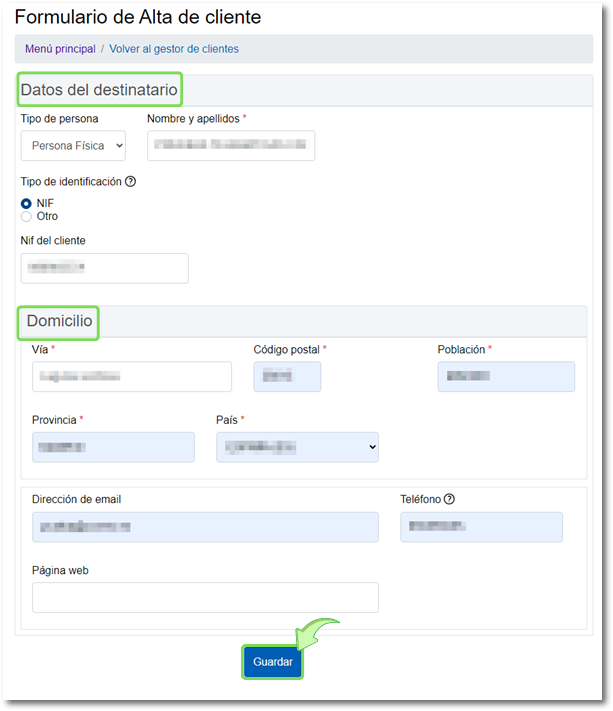
To create a new client press the button "New customer" located at the top.

In the form, select the type of person, physical or legal, and the type of identification, "NIF" or "Other", if you select "Other" you must select the recipient's country code and identification type. Finally, fill in the address and click "Keep" at the end of the form. However, if you select "Other" as the identification type, the province and postal code fields will be optional.
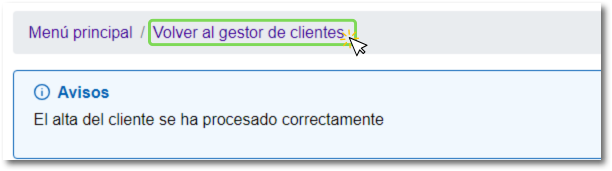
If the registration has been completed correctly, you will see a notice indicating this. Click "Back to Client Manager" at the top, where you'll see the new client in the list.
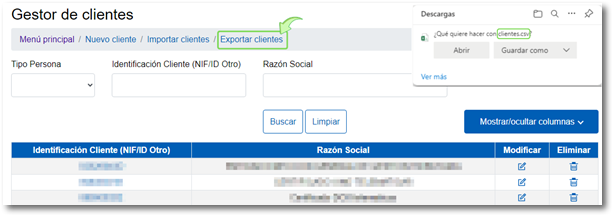
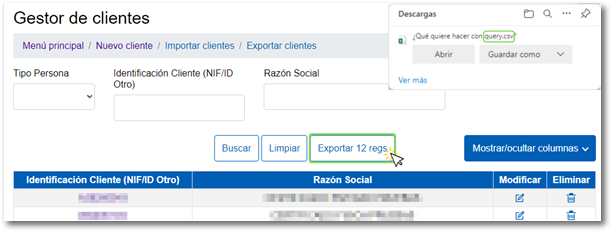
In the client list you have options to export and import the list. By exporting your list you get a backup copy of your customers.
Click on "Export customers", located at the top, to generate the file called "clients.csv" with all the records, it will be saved in the "Downloads" folder or in the one you have set in your browser for downloads.
If your list has more than 10 clients, press "More"/"Next" and another button will be activated to export your list with the name "Export X regs" (where X is the number of clients in the list) obtaining a file called "query.csv".
The option "Import customers" allows you to load a previously created list of clients. Supported files are plain text files (e.g. created with Notepad or some other text editor).

The structure that the file to be imported must have is as follows:
Name or Company Name#Tax ID#Address#Postal Code#City#Province#Country Symbol#Email#Telephone#Website
The following recommendations should be followed:
- The header is mandatory; that is, the first line of the file must include the above content: Name or Company Name#Tax ID#Address#Postal Code#City#Province#Country Symbol#Email#Telephone#Website
- Name or Company Name and NIF They are mandatory.
- Starting from the address, if a field is not filled in, a double bracket should be left to specify that it is blank. Example without including phone number: Email##Web
Examples:
Company Name#Tax ID#Calle la Salle 1#28002#Madrid#Madrid#ES#yo@yo.com#910000000#www.lasalle.com#
First Name Last Name 1 Last Name 2 #NIF# Julian Pinto Street 20#28002#Madrid#Madrid#ES#yo@yo.com#910000000#www.julian.com#
First Name Last Name 1 Last Name 2 #NIF#Pili Latorre Street 20#28002#Madrid#Madrid#ES#yo@yo.com#910000000#www.pili.com#
Company Name#Tax ID#Street Services Roundabout 3#21047#Alicante#Alicante#ES##9122021212##
Name Surname1#NIF#Street Services Roundabout 3#21047#Alicante#Alicante#ES##9122021212#www.luisi.com#
Name Surname1#NIF#########
The customer manager allows you to delete multiple customers at once using the "Multiple customer deletion"
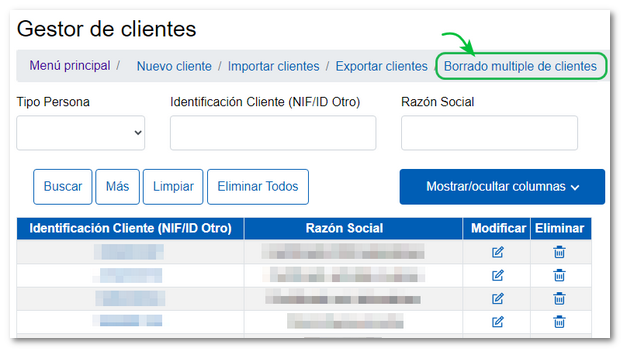
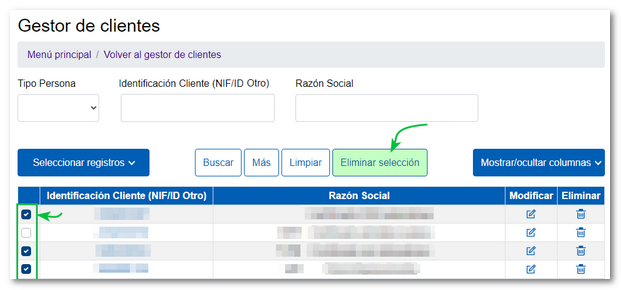
Clicking this opens a window where you can select the clients you want to delete. Once selected, press the "Delete selection" button. However, from the "Select records" button you can select all the displayed records in the list, deselect the displayed records, and deselect all of them.
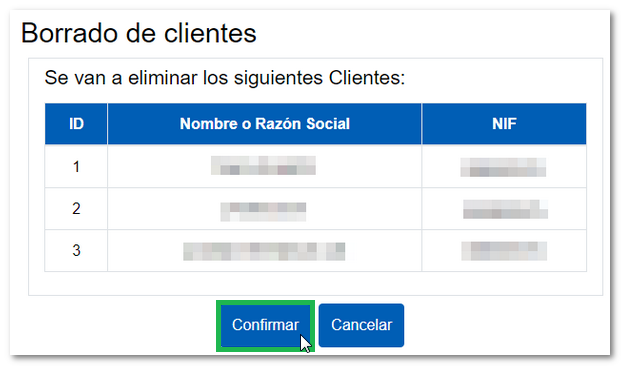
In the next window you will see the list of selected clients; if you agree, press "Confirm". You will receive a notification with the list of deleted customers.
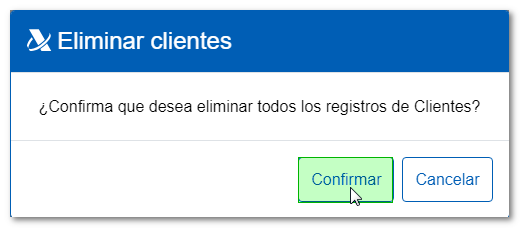
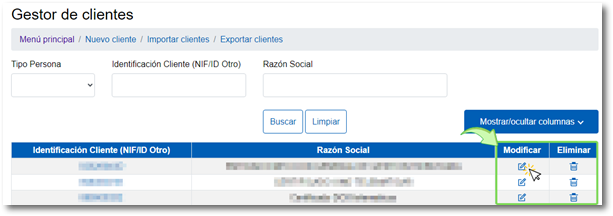
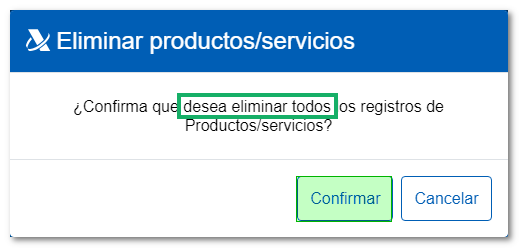
You can also delete only one customer by clicking the trash can icon in the "Delete" column, or delete ALL customers from the list by clicking the "Delete all" button.

Before deleting the entire list, you must confirm this decision.
The option to " is found in the customer listModify"a client from the list by clicking on the corresponding icon, keep in mind that certain fields cannot be modified, for example, the "Identification Type" field NIF/ID Other". You also have the "Show/Hide Columns" button to select the columns that interest you most.
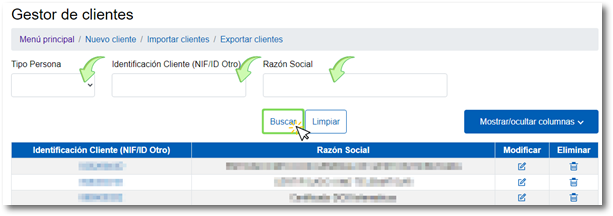
You can also make one customer search. You can set a filter by selecting the type of person, natural or legal, or obtain a more detailed search by completing the "Client Identification" box (NIF/ID Other)" or the "Name and surname/Company name" box.
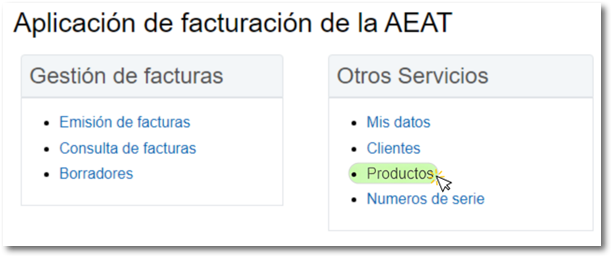
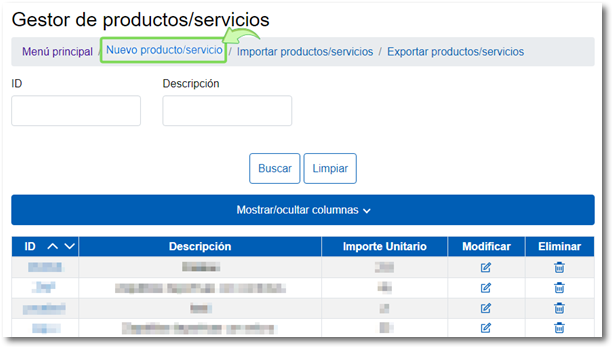
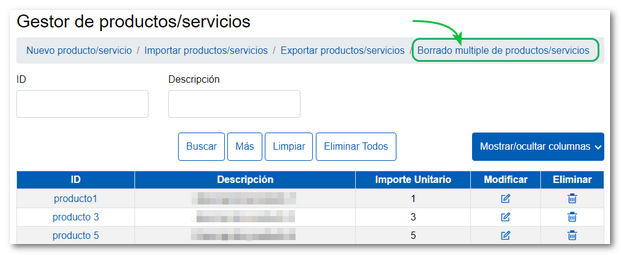
From the main menu of the billing application of the AEAT You can manage products and services in the "Other Services" section, "Products".
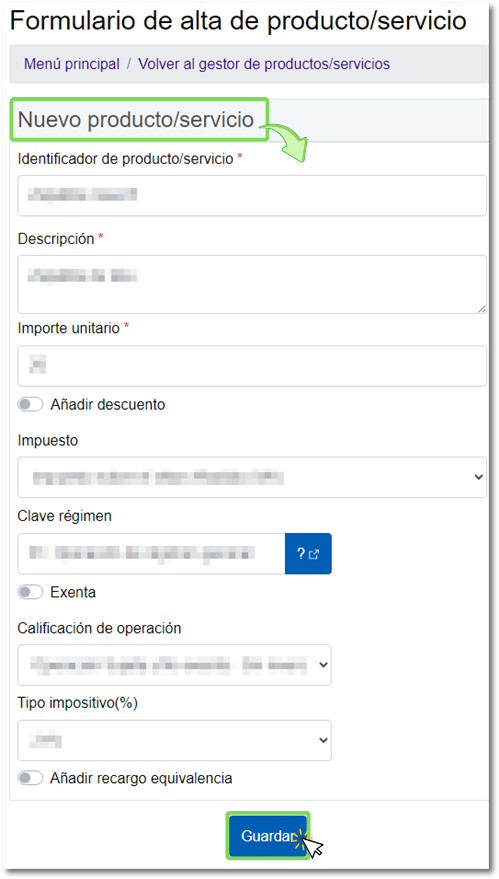
You can create a list of products and services to later easily add them to your invoices. To register a product or service, click on "New product/service" at the top.
Complete the form and click "Save." You will see a warning message, click "Return to product/service manager."
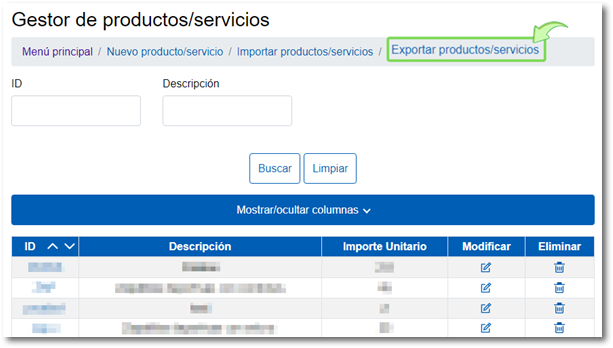
You also have the options to export and import a list of products/services.
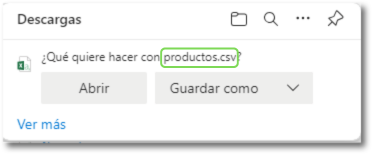
Click on "Export products/services" to obtain the "products.csv" file that will be saved in the "Downloads" folder or the one you have set in the browser for downloads. You can open and edit this list (for example, using Excel or a text editor).
The option "Import products/services" Located at the top, it allows you to upload a list of products or services previously created with plain text files, for example with Notepad or some other text editor.

The structure that the file to be imported must have is as follows:
ID#Description#Unit Price#Discount Concept#Discount Amount# VAT/IPSI/IGIC Code#Regime Key Code#Operation Qualification Code or Exempt Operation#Tax Rate#Equivalence Surcharge Rate
The following recommendations should be followed:
- The header is mandatory; that is, the first line of the file must include the above content: ID#Description#Unit Price#Discount Concept#Discount Amount# VAT/IPSI/IGIC Code#Regime Key Code#Operation Qualification Code or Exempt Operation#Tax Rate#Equivalence Surcharge Rate
- ID is a unique identifier that we will choose for our product (without spaces)
- ID, description and unit price are required
- Unit amounts with decimals are accepted. The separator between the integer and decimal parts must be the period character ".".
- If a field is missing, it will be left blank, indicating this with double brackets “##”. Example where Discount Concept and Discount Amount are missing: Unit Price###S1
Examples:
IDPROD1#Product Description 1#120###01#01#S1#21##
IDPROD2#Product Description 2#120###01#01#S1#10#1.4#
IDPROD3#Product Description 3#120###01#01#E1###
IDPROD4#Product Description 4#120########
IDPROD5#Product Description 1#120.25###01#01#S1#21##
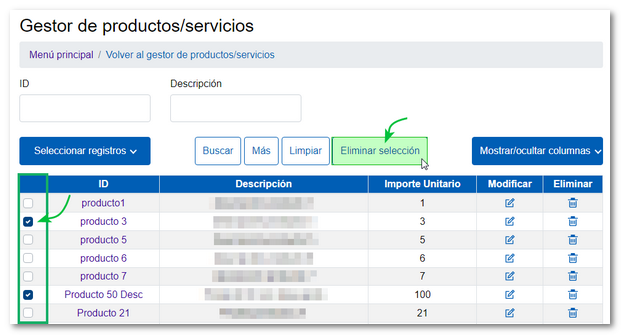
The product/service manager allows you to delete multiple products/services at once using the "Multiple deletion of products/services
Clicking this opens a window where you can select the products/services you wish to delete. Once selected, press the "Delete selection" button. However, from the "Select records" button you can select all the displayed records in the list, deselect the displayed records, and deselect all of them.
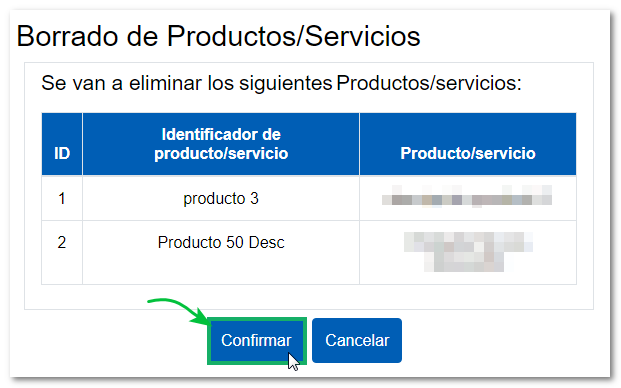
In the next window you will see a list of the selected products/services; if you agree, press "Confirm". You will receive a notification with the list of removed products/services.
You can also delete only one product/service by clicking the trash can icon in the "Delete" column, or delete ALL products/services from the list by clicking the "Delete all" button.
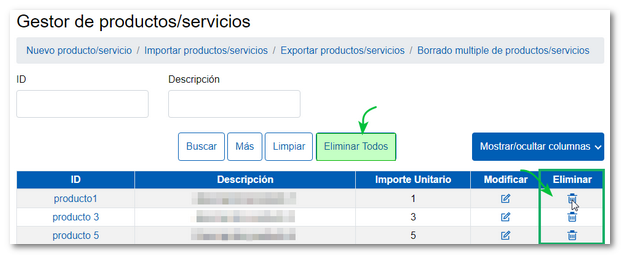
Before deleting the entire list, you must confirm this decision.
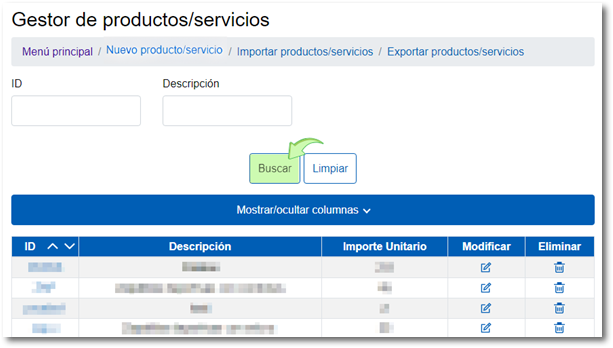
The option for "Modify" a product/service from the list by clicking on the corresponding icon. You can also modify the product/service you need by clicking on the ID. Additionally, you have the "Show/Hide Columns" button to select the columns that interest you most.

Also, in product/service management, you can make a search by setting a filter by filling in the "ID" box that we have previously created and have in our list or the "Description" box.
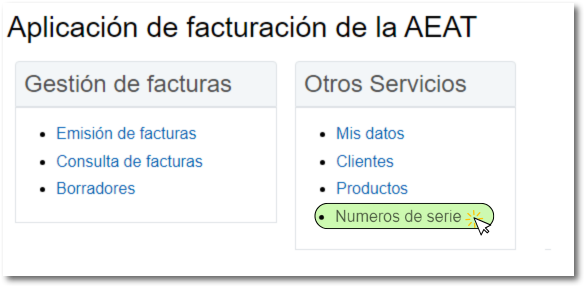
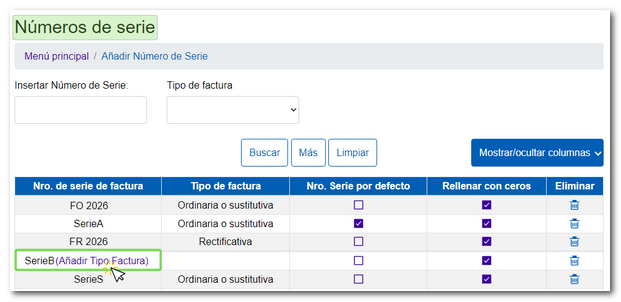
From the main menu of the billing application of the AEAT You can manage your invoice serial numbers in the "Other Services" section, "Serial Numbers".
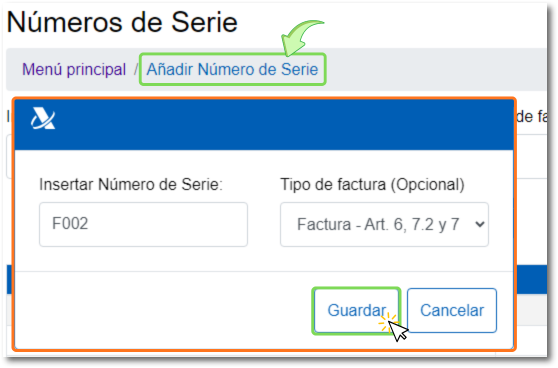
To add a serial number, click "Add Serial Number" at the top. A window will open for you to set the serial number and also the type of invoice (mandatory field) associated with that series, which can be "Ordinary or substitute" or "Corrective". To finish, click "Save."
The boxes marked in the "No. "Default Series" will tell the manager from which Series Number to generate grouped invoices, which will be consecutive to the last one generated.
The boxes marked in the "Fill with zeros" column will fill the next generated invoice with zeros and will have a number sequential to the last invoice in the series.
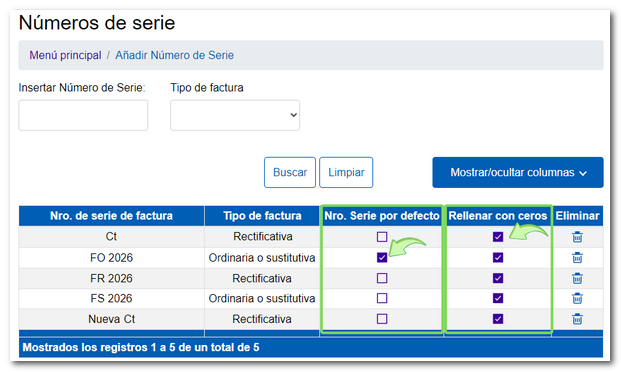
The option " is found in the listEliminate"which allows deleting invoice serial numbers from the list." This option can only be done one at a time by clicking on the trash can icon. You also have the "Show/Hide Columns" button to select the columns that interest you most.
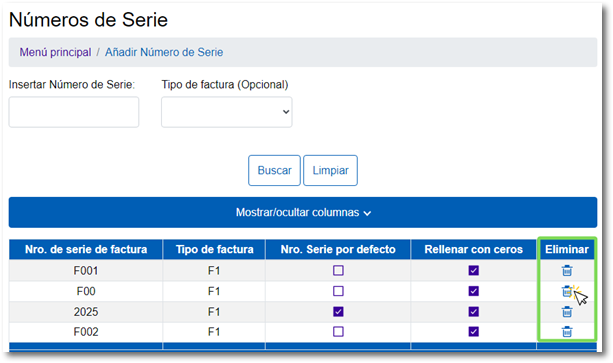
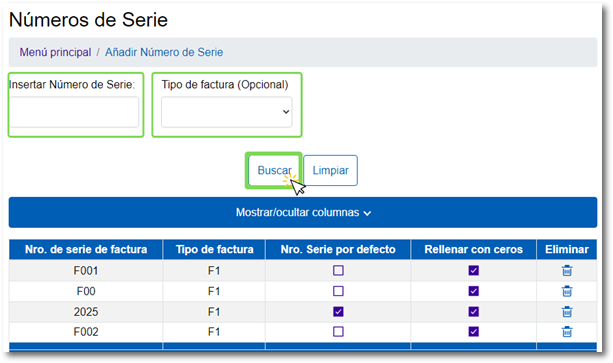
Additionally, in invoice serial number management, you can perform a search by setting a filter if you fill in the "Insert Serial Number" and "Invoice Type" boxes or only one of them.
It is mandatory to generate at least one series for ordinary or substitute invoices and another series for corrective invoices, in order to comply with the obligation established in the Billing Obligations Regulation, regarding the sequential numbering of invoices (articles 6.1.ay 7.1.a).
From February 2026, invoice series must have an associated invoice type. Therefore, invoice serial numbers that were previously registered in the application without specifying the invoice type, whether ordinary, substitute, or corrective, cannot be selected when issuing an invoice.
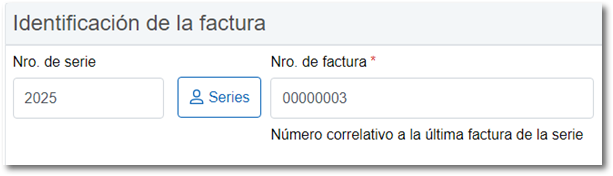
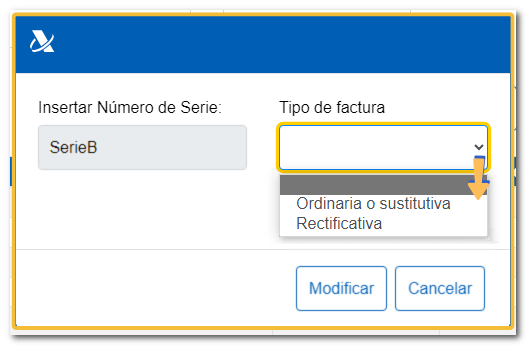
In order for that series to be used, it is mandatory that it has an assigned invoice type. It's as simple as opening the "Serial Numbers" manager and, from the "No." list. invoice series", click on the text "Add Invoice Type"of the corresponding series."
In the new window, click on the "Invoice Type" box to select "Ordinary or Substitute" or "Corrective". Finally, to associate the invoice type with the series, click on "Modify"
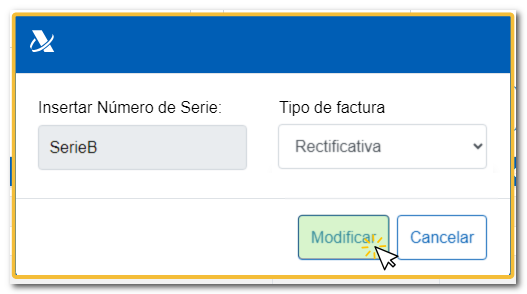
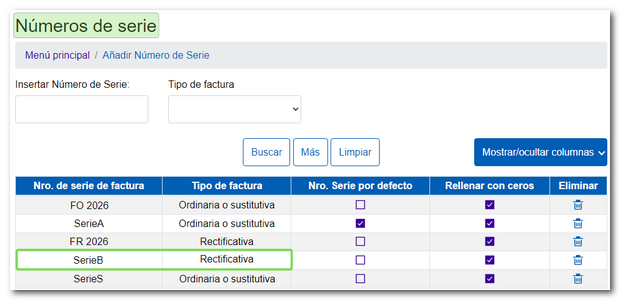
You will return to the serial number manager with the assigned invoice type. In this way, the series can be used for ordinary, substitute, or corrective invoices.
It is mandatory to generate at least one series for ordinary or substitute invoices and another series for corrective invoices, in order to comply with the obligation established in the Billing Obligations Regulation, regarding the sequential numbering of invoices (articles 6.1.ay 7.1.a).
In the previous FAQ, "How to manage serial numbers", you can find more details on how to create and use your invoice series.
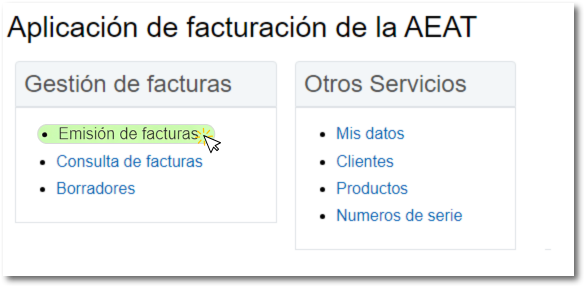
From the "Invoice Management" section, "Drafts" located in the main menu of the billing application of the AEATYou can access invoices that you previously saved as drafts, invoices that were left incomplete, or save templates for later use.
To create a draft, simply start a new invoice by clicking "Issuing Invoices" in the main menu.
Fill in the fields that interest you for later use and press the "Save Draft". Please note that this invoice saved as a draft will have no tax implications.
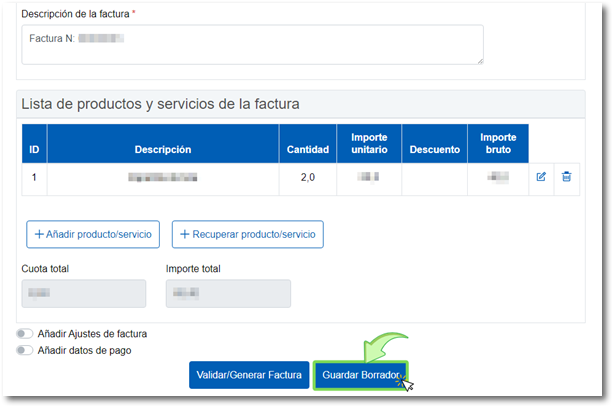
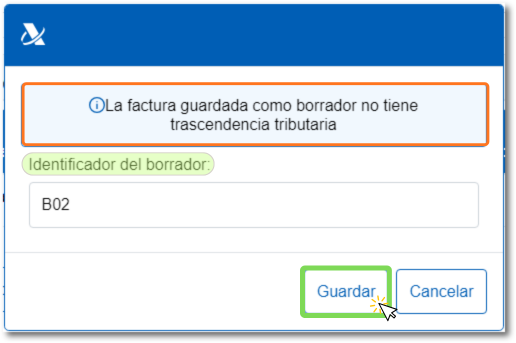
Clicking "Save Draft" will open a window for you to enter a draft ID, which will be the name you give your template. Then, click "Save." This will save your draft to the Draft Manager.
To search for a draft and use it as a template, click on "Drafts" from the main menu.
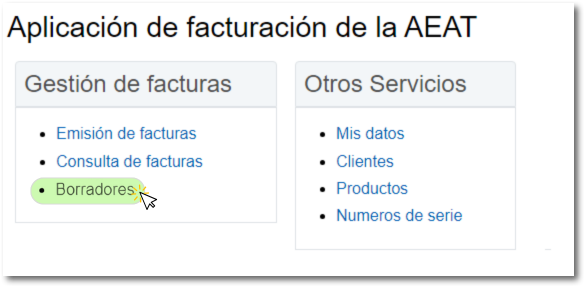
In the new window, a list will appear at the bottom with the drafts you have uploaded. If you want to search for a specific one, enter the name of the draft in the "Eraser Key" and press the button "Look for". You can also use other filters depending on the boxes filled in. Remember, the eraser will expire after 4 months if you don't use it.
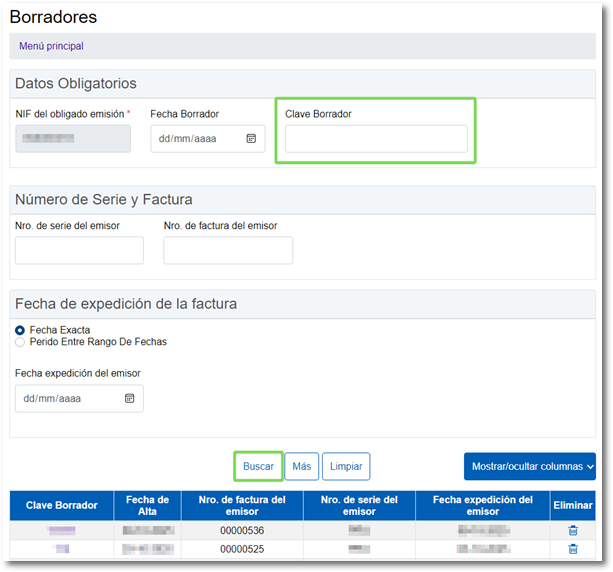
To open a draft, click on the desired record in the "Draft Key" column. From this window you can also delete a draft by clicking on the trash can icon.
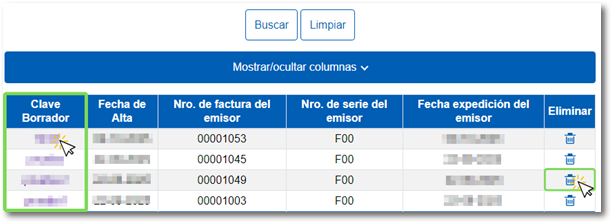
You also have the "Show/Hide Columns" button to select the columns that interest you most.