How to submit a draft or declaration using Renta WEB with Cl@ve
Access to the processing of your declaration from Renta WEB is available through Cl@ve . Within the "Featured Management" section of Renta, access "Draft/Tax Return Processing Service (DIRECT Income Tax and WEB Income Tax)" and press " Cl@ve Mobile Cl@ve".
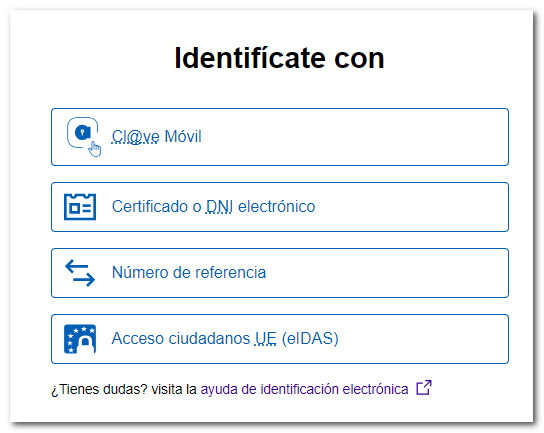
You have three ways to access with :Cl@ve
- Scanning the QR code with the APP Cl@ve
- Continue without reading the QR code, in which case you must enter your DNI or NIE details plus the contrast data
- Log in with Cl@ve Mobile Cl@ve by SMS obtaining a PIN by sending the SMS to your mobile.
We explain each of them in more detail.
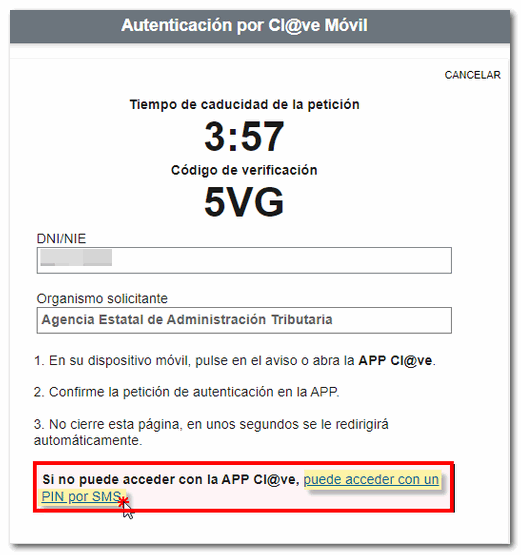
Press "Cl@ve Mobile Cl@ve," the authentication window will appear. Cl@ve mobile phone with a verification code, the expiration time of the request and a QR code along with instructions for accessing with the APP of Cl@ve scanning the QR code.
If you do not have the APP Cl@ve installed, you have the link "Don't have it installed?" so you can install it. Before scanning the QR code, verify that the website URL starts with https://www2.agenciatributaria.gob.es.
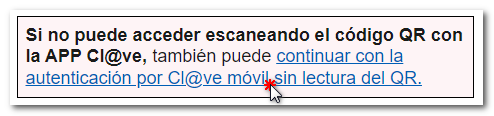
On the other hand, if you cannot scan the QR code, tap on the alternative "Can't access by scanning the QR code?". 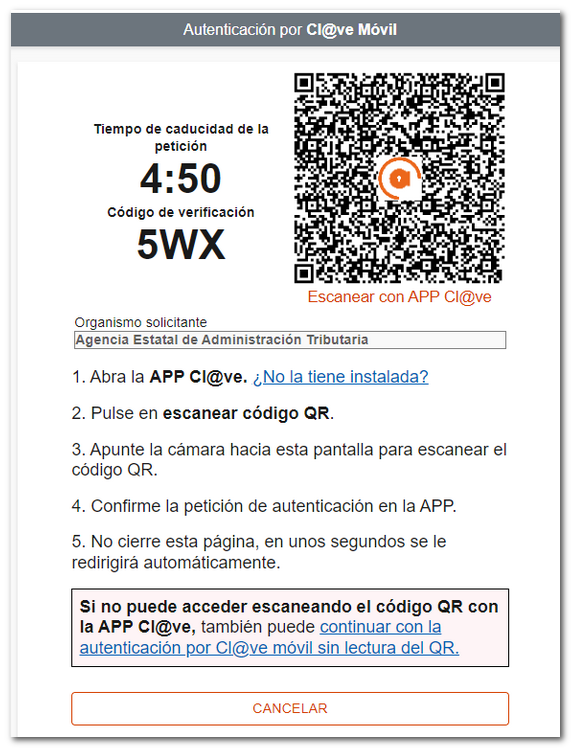
Open the APP Cl@ve , press "Scan QR code" and focus the reader on the QR code displayed in the browser.
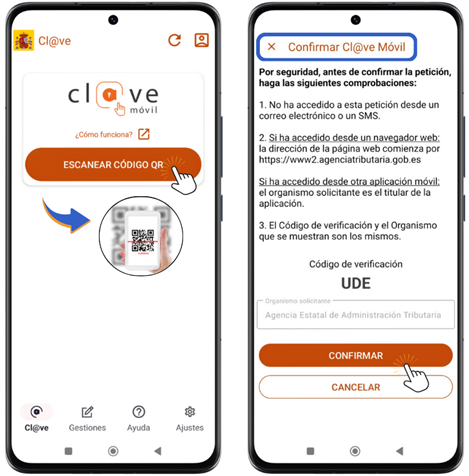
After scanning the QR code, perform the security checks and verify that the web page address where you are initially identifying yourself begins with https://www2.agenciatributaria.gob.es; if correct, press the button; "Yeah" To help you with this verification, click on the link "Where to see the website address?". In the next window, verify that the verification code and the organization match those in the request and click "Confirm".
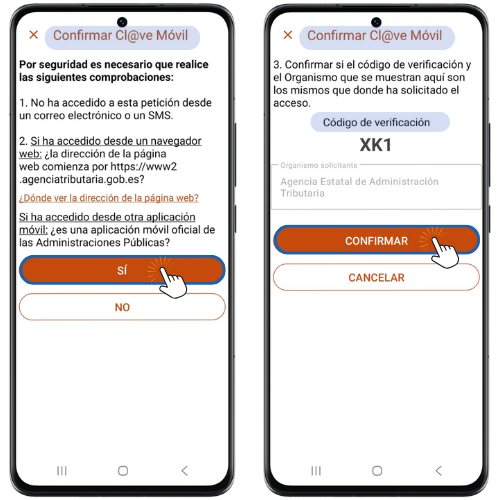
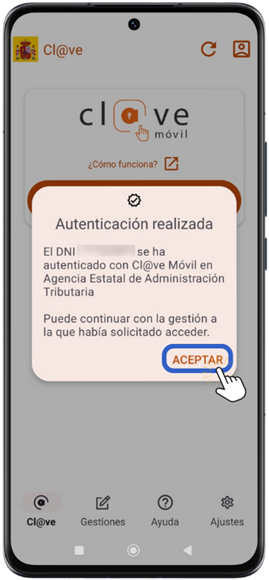
You will need to confirm a second time by entering the device unlock factor (fingerprint, pattern, facial recognition, pin, etc.).
Finally, the notice "Authentication completed" will be displayed in the APP and, in the web browser, you will access the management that you were trying to carry out once authenticated.
If you cannot scan the QR code or prefer to continue without scanning the code, press the option "Can't you access it by scanning the QR code?".
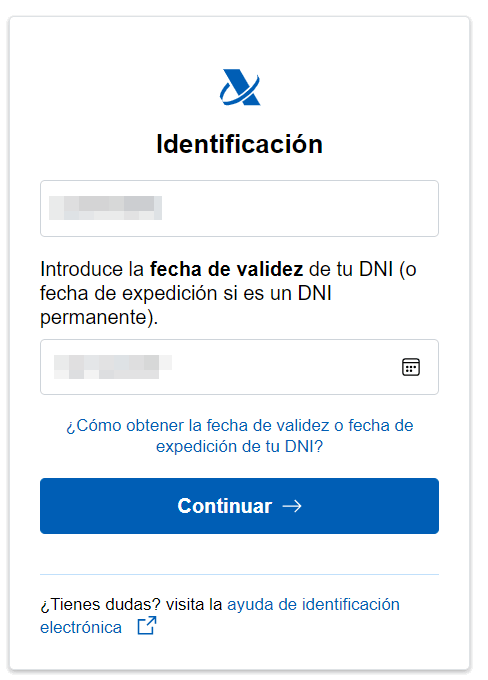
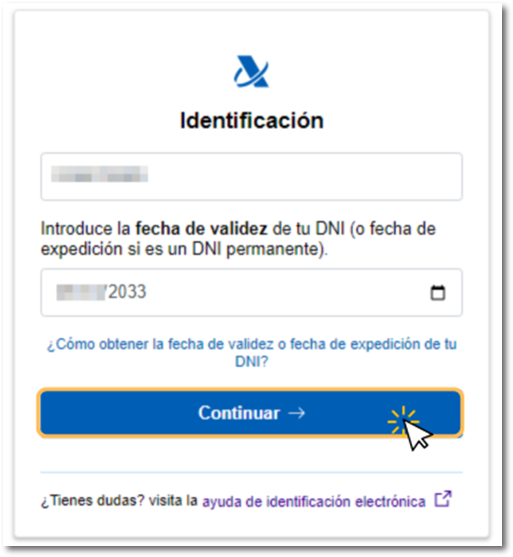
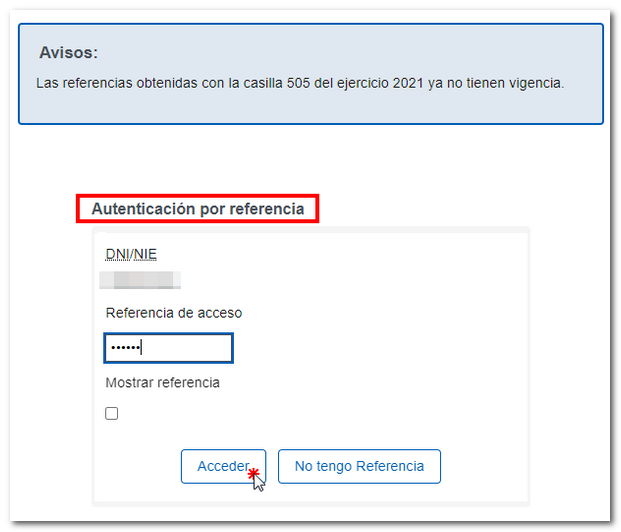
Please indicate your DNI or NIE and the verification data depending on the type of document:
- Validity date , for DNI ;
- Date of issue, if you ID card is permanent (01-01-9999).
- Support number , if it is a NIE .
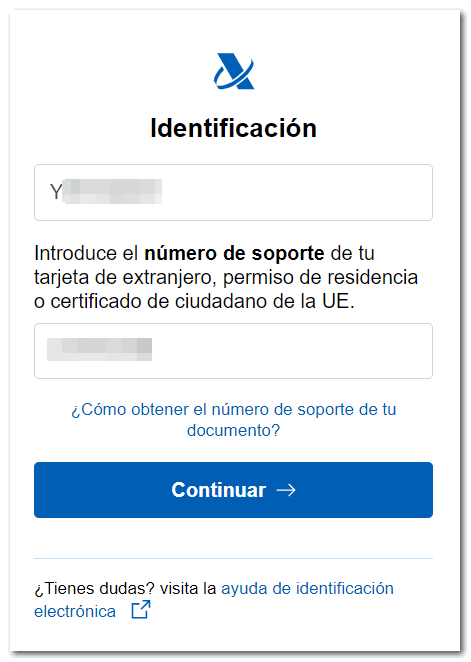
Below you will find a help link to locate the required verification information on your identity document.
After entering the data correctly, click "Continue".
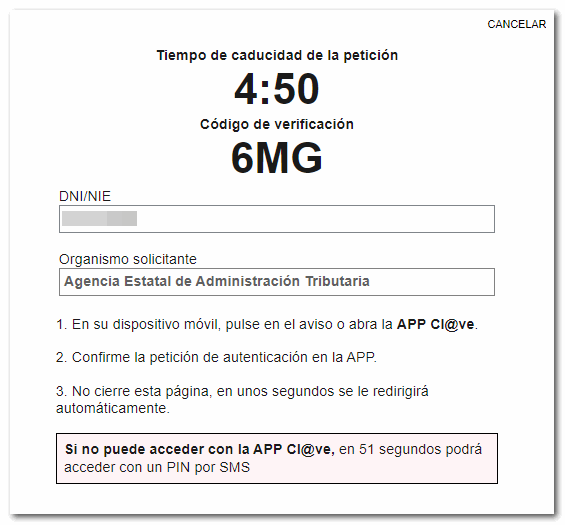
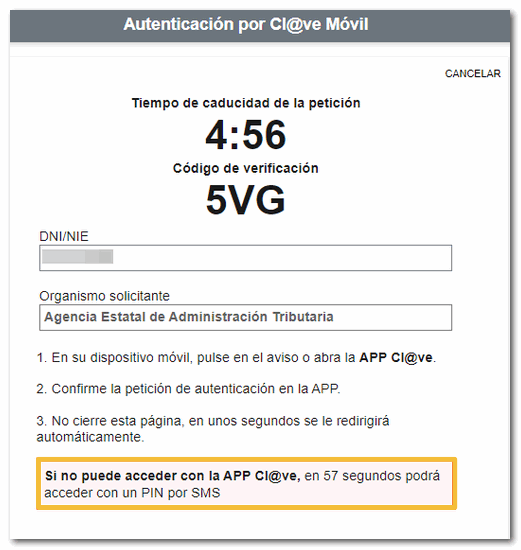
The authentication request will be displayed on the screen with the data of ID card / NIE, from the requesting organization, the 5-minute validity counter for the request, the verification code and instructions to open the APP and confirm the request. Verify that the web page address where you are logging in begins with https://www12.agenciatributaria.gob.es
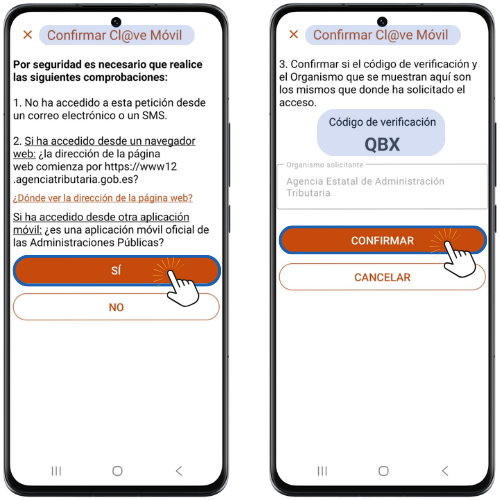
Open the APP and the authentication request will be displayed with Cl@ve Mobile with the same data as above. Press "Confirm".

For security, perform the checks outlined and verify that the authentication webpage address is correct. Cl@ve Mobile Cl@ve starts with https://www12.agenciatributaria.gob.es, if correct press the button "Yeah". To help you with this verification, click on the link "Where to see the website address?". In the next window, verify that the verification code and the organization match those in the request and click "Confirm".
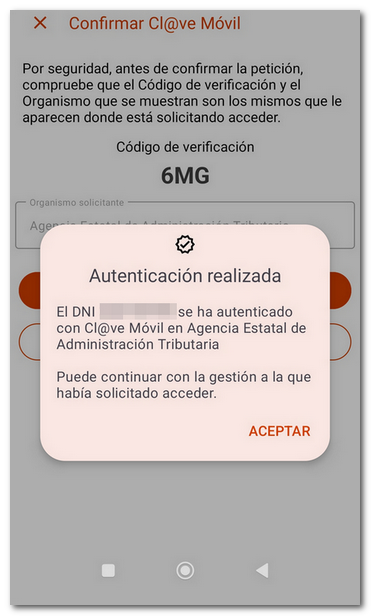
It will also be necessary to enter the authentication factor established for the mobile device (fingerprint, PIN, pattern, facial recognition, etc.). Finally, the notice "Authentication completed" will be displayed and you will be able to access the process you were trying to perform.
Please access the website again to access the Renta services.
You can also request to receive a PIN code via SMS , if you wish or if you have not activated the user in the APP Cl@ve or have not yet installed it, to do so, wait 60 seconds for the button "ACCESS WITH A PIN BY SMS " to be activated.
You will receive a 6-digit numeric PIN for SMS that must be entered in the "Access PIN" field, enter it in the box. Verify that the web page address where you are logging in begins with https://www12.agenciatributaria.gob.es. Finally, click "Login".

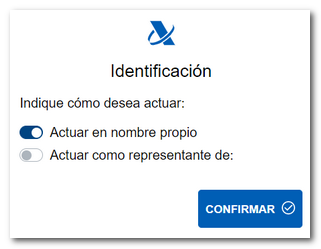
After identifying yourself with Cl@ve , select the type of action: on his/her own behalf or as a representative.
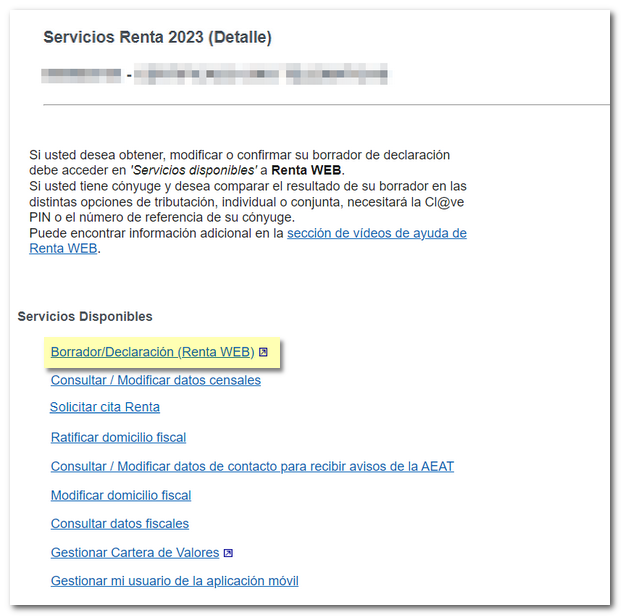
Once in your file, access the option "Draft/Declaration Processing Service (Direct Income and WEB Income)" in the "Available Services" section.
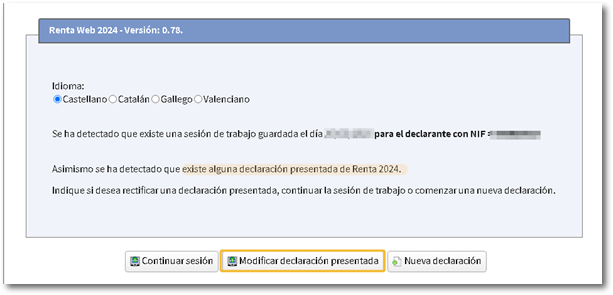
If you have already accessed Renta WEB at some other time, a pop-up window will inform you of the existence of a previous declaration, which you can recover from the "Continue session" option or start a new one, incorporating the tax data from the "New Declaration" option. You will also be able to choose the language in which you wish to make the declaration.
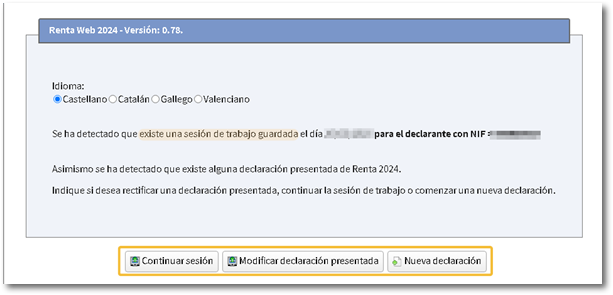
If you have already submitted the declaration, the program will detect that a declaration has already been submitted for this year and will also give you the option to rectify it using the "Modify submitted declaration" button.
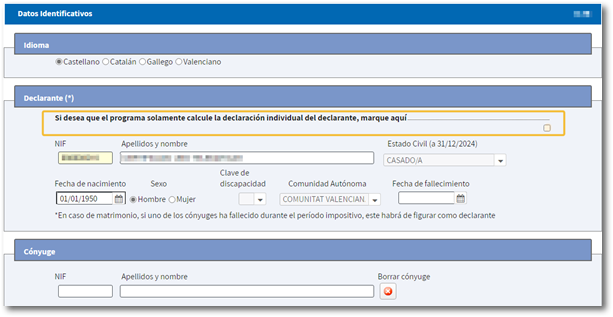
Identification details
If you press "Continue session" you will directly access the "Declaration summary". From this window, you can continue adding data to the declaration using the "Declaration sections" button and, if you agree with the result, you can click "Submit declaration" in the modality you want (Declarant, Spouse or Joint), depending on the most favorable situation.
If you click on "New declaration", the window will load with the "Identification data" of the declarant and other declarants, if you are part of a family unit. If you want the program to only calculate the declarant's individual declaration, check the box "If you want the program to only calculate the declarant's individual declaration, check here" located at the top, above the declarant's data.
Declarations with spouse
If you have not checked the box to calculate the individual declaration and you are part of a family unit, you will need to process the authorization of the data of the spouse and children who have obtained income, by reference or Cl@ve . This way you can check which is the most favorable tax option and perform the corresponding calculations for each modality (joint or individual).
In this case, press the "Reference/Cl@ve" In the "Spouse's Authorization" section, a pop-up window will appear allowing you to include the reference or identification with Cl@ve Mobile Cl@ve indicating the ID card either NIE plus the spouse's verification data and confirming access from the APP or indicating the 6-digit PIN received via SMS. If the data is correct, click "Confirm" to continue with the process.
NOTE : Access is permitted using the spouse's data by means of a power of attorney (100P) which exempts the need to give authorization on this screen by means of the reference or Cl@ve Mobile Cl@ve of the spouse or children who have received income. In these cases, it is possible to continue by pressing "Accept" at the bottom of the identification data window without needing to press the "Reference/" button.Cl@ve Mobile Cl@ve". However, if you have a power of attorney, by clicking on the "Reference/" buttonCl@ve " Mobile Cl@ve" automatically changes to "Authorized", without going through the authentication process. In both cases, the data of the spouse or children who receive income are transferred to the declaration. The power of attorney also exempts one from the need to indicate the reference or Cl@ve of the spouse or children who receive income at the time of filing.
If you have any questions about how to obtain your Income Tax reference number or how to identify yourself using Cl@veCheck the available aid.

Authentication by Cl@ve Mobile:
Authentication by reference:
From this same window you can modify or add information to the reflected data. Please note that family status (marital status, among others) cannot be modified later. Tap the icon with a pencil symbol or double-click the box to edit or add new members to the family unit. To delete them, press the cross icon.
Verify the identification data and click "Accept" at the bottom.
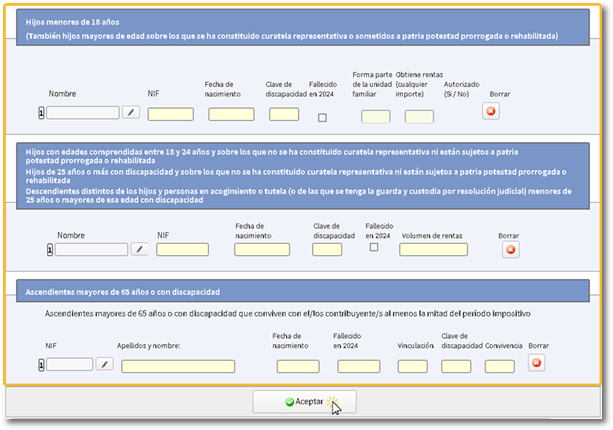
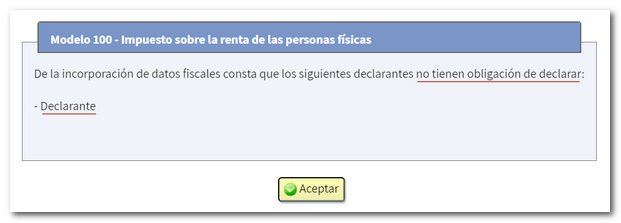
If any taxpayer is not required to file a return, a pop-up window will inform you.
Data transfer with additional information
When accepting the identification data window, depending on the tax data, a notice may be displayed requesting additional information to transfer additional data to the declaration.

Select the "Yes" box in the "Incorporate" column to transfer them to the declaration. After completing the data by answering the questions that appear and providing the necessary additional data, you will be able to access the declaration summary and from there continue making changes or submitting the declaration.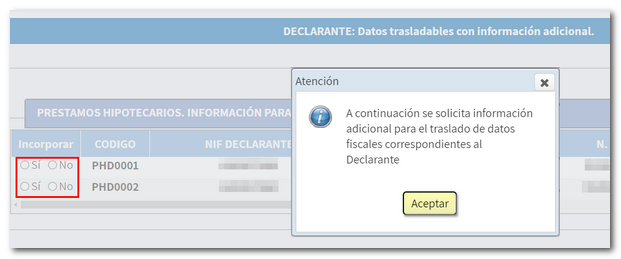
If you do not need to enter additional information to generate the declaration, you will directly access the declaration summary, from where you can check the result of the declaration for each type and complete the declaration if necessary.
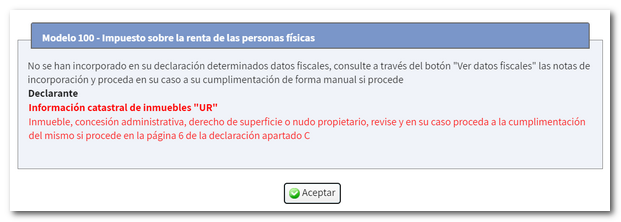
If there is any data not included in the declaration, a window will be displayed beforehand informing each taxpayer individually about which data is missing, so that they can complete it in the corresponding section of the declaration or the non-obligation status of some declarant. You can consult the incorporation notes, with more detailed information, through the "View tax data" button, located at the top, and fill in the data later in the corresponding section.
Summary of statements
The “Declaration Summary” window shows the breakdown and result of the different types of declarations that could have been calculated (joint and individual) with a note on the most favorable option.
From each of the returns, you can download a PDF with a preview of each declarant's or joint return, which is not suitable for filing but can be used as a reference. Please note that in order to view documents in PDF format, you need to have a PDF file viewer installed on your computer. If you agree with the result, you can click "Submit declaration" in the modality you wish (Declarant, Spouse or Joint), depending on the most favorable situation.
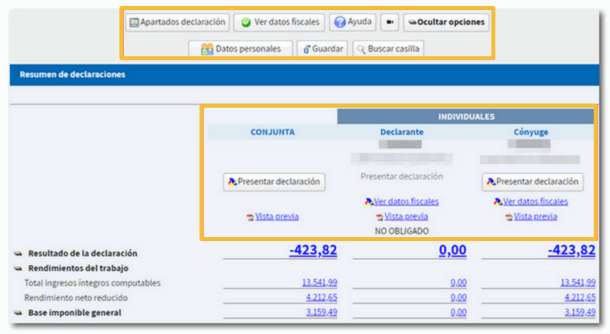
At the top, you have a menu from which you can check the tax data that has been transferred for each declarant and access the different sections to check all the data and continue completing the declaration, through the "Declaration sections" button.

By clicking "Show options", more buttons will be enabled that will allow you to consult the identification data, save the declaration on the AEAT server or search for a specific box in your declaration.


In the menu, you'll find a "Notes" button where you can jot down anything you think will help you complete the form.

Filing the return.
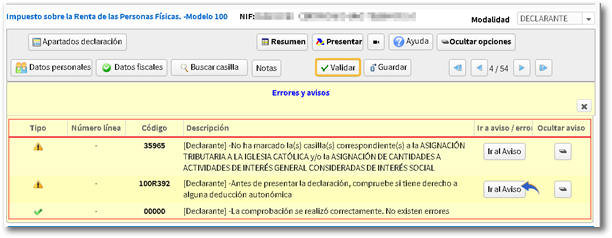
Before filing the return, check if there are any errors in the completion by clicking the "Validate" button.
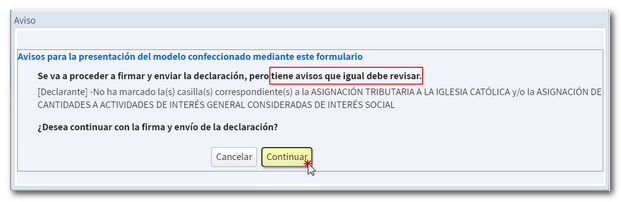
The notices do not prevent you from filing the return and are only there to verify completion. If the message is an error, you must correct it so that the declaration is considered valid at the time of filing. To review the warnings or errors, press the "Go to Warning" or "Go to Error" button. Please note that the notices only recommend the review of some sections, but do not prevent the filing of the declaration. Errors must be corrected for said presentation.
If you get a "Warning" when you click "Validate", click the "Go to warning" button and review the information. To confirm that you have read it, tick the "Read/Hide" checkbox, which ensures that you have viewed the warning before submitting the declaration. If you do not check the box, you will not be able to continue with the filing and will receive the message "Review the warnings before filing the return".
Once you have checked that it does not contain errors, click "Submit return." Keep in mind which modality you are in at the time of filing the declaration.

NOTE : If you use the "Submit declaration" link available in the "Declaration summary", the method you have chosen to submit is selected by default. If you submit the return from the declaration window with its sections, you must manually select whether you wish to submit a "Joint Declaration" or an "Individual Declaration". If you select "Individual Declaration", the available declarations for filing will be enabled: declarant, spouse and other declarants (children).
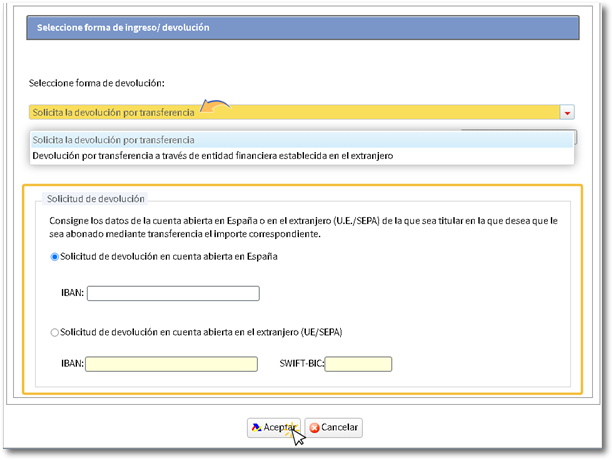
If the result of the declaration is a refund , choose whether you want the refund by transfer or if you want to waive the refund in favor of the Public Treasury.
-
You can request a refund by transfer to an account opened in Spain or through an account opened in a financial institution established abroad ( EU/ SEPA ). Check the code IBAN of the account to which you want the refund to be made, by default, the account IBAN indicated in the previous exercise will appear; However, you can modify it in this step.
-
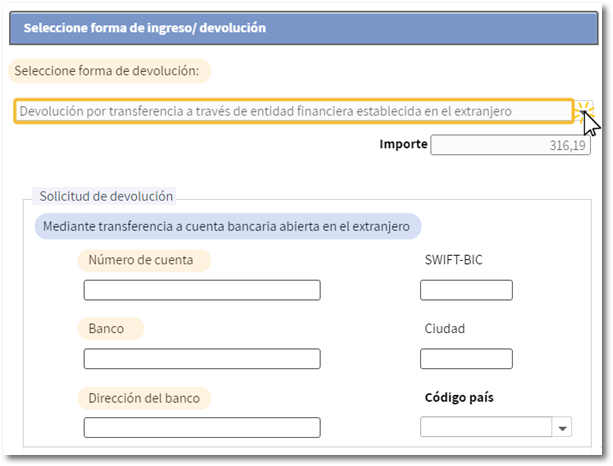
There is also the option of a refund by transfer through a financial institution established abroad and which does not belong to the EU/ SEPA area. All fields are mandatory except for SWIFT-BIC, which is optional. In Country Code, one corresponding to EU/SEPA cannot be indicated. You must provide the account number, bank, city, address, and country.
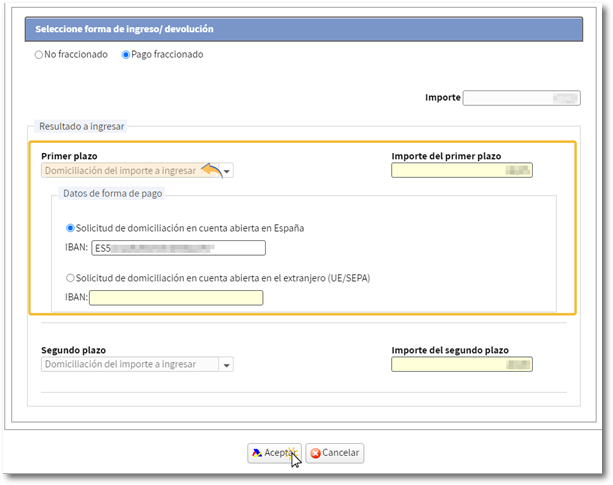
If the return results in income , first mark whether you want to split it into two payments or not.
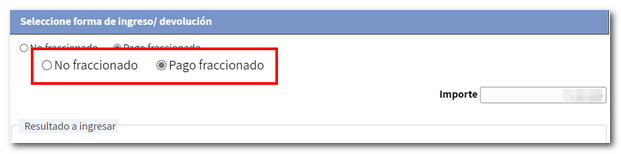
You will then be able to select various payment options.
-
Direct debit of the amount to be paid . The submission with direct debit can be made from April 8th to June 25th, both inclusive. Select the option "Direct debit of the amount to be paid" and enter the IBAN of the account into which you want the refund to be made. You also have the option of setting up direct debit from an account opened abroad within the area EU/SEPA.
-
To enter with Electronic Payment . In this case you can choose from three payment methods:
-
Payment by direct debit from account . It will connect you to the payment gateway to obtain the NRC at that time, charging the amount to the account you assign. Once the payment has been made, transfer the NRC automatically to Renta WEB to finalize the submission.
-
Payment by card or Bizum . It will connect you to the online payment platform, where you will be asked to enter either your card details or the phone number where the payment request will be sent via Bizum, in the bank's app.
-
Recover a previous payment (NRC). You must make the full payment from your Bank, generating the NRC proof of payment, either at their offices or through electronic banking offered by your bank. You will then need to enter the NRC in the "Reference number NRC " box. Instructions are also shown on how to cancel a NRC already generated, so that those taxpayers who have generated erroneous NRCs can cancel it by pressing the "How to cancel" button NRC" Keep in mind that the field NRC The main screen is not editable to avoid errors. To modify it, you can return to the "Recover a previous payment" option (NRC)". You can also delete it from the trash can icon located next to the "Reference Number" field NRC"

-
-
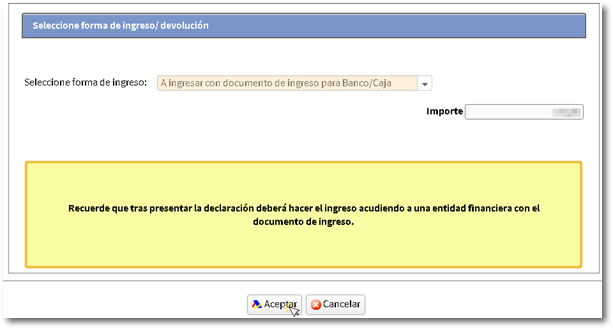
To be entered with Bank/Cashier deposit document . It allows you to obtain the income document to pay it at the Bank or Cash Register. With this option, the declaration will remain pending payment at your financial institution. In it PDF Proof of this type of presentation includes the payment letter (Model 002) for payment of the same.
-
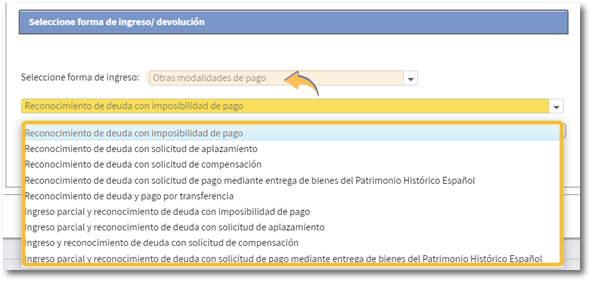
Other payment methods . If you do not split the payment, you may use, for example, the recognition of debt with impossibility of payment, a request for deferment or payment by transfer to an account of a Non-Collaborating Entity, among others.
After selecting the payment method, press "Accept" to submit the declaration.
Remember that in joint declarations it will be necessary to indicate the reference or identification with Cl@ve of the spouse or child (depending on whether validation has already been performed in the current session or whether the presenter has power of attorney from the spouse or child), to submit the declaration, regardless of the type of access of the declarant (in this case with Cl@ve Mobile Cl@ve). The reference number is individual for each declarant.
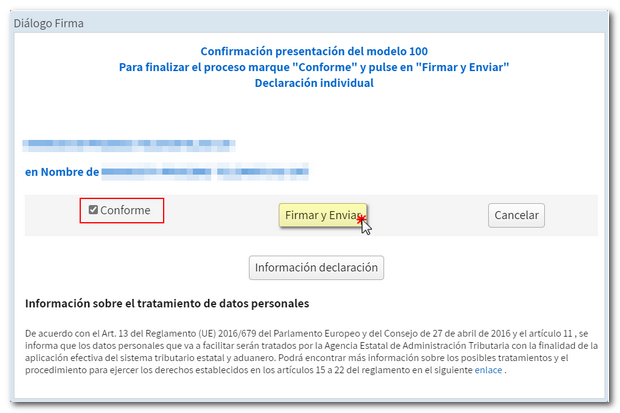
If there are any warnings, you will be informed of them before you proceed with signing and sending the declaration. Click "Continue" if you wish to proceed.
In the new window, check the "I agree" box and click "Sign and Send" to complete the filing of the declaration. The "Declaration information" button will display the details of the declaration.
When your return has been submitted, you will see the message "Your submission has been completed successfully" and the assigned secure verification code. In addition, a PDF will be displayed containing a first page with the submission information (registration entry number, Secure Verification Code, receipt number, day and time of submission and presenter data) and on the subsequent pages, the submitted declaration.
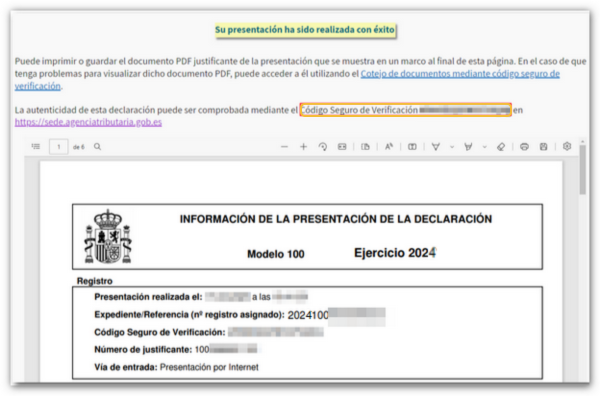
You can print or save this page as proof of the information from your online submission. To print the page, right-click it and choose "Print" from the menu or click the printer icon at the top edge.
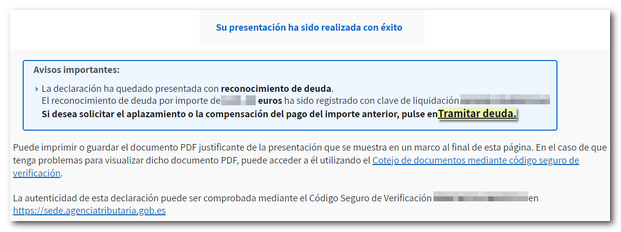
In cases where there is recognition of debt, a link to submit the deferral or compensation request will be displayed on the response sheet for successfully submitting the request. Click on "Process debt" and the settlement details will appear with the debtor's details and the settlement code. You will have to choose between one of the available options: defer, compensate or pay.
If you access "Renta WEB" again. Draft/declaration processing service (Renta WEB)", you will see that in the "File History" section "Recording of your declaration" appears with the date on which it was made. Also check that the message "Your declaration is being processed" appears at the top.